|
|
| (No se muestran 2 ediciones intermedias de 2 usuarios) |
| Línea 3: |
Línea 3: |
|
| |
|
| === Historia === | | === Historia === |
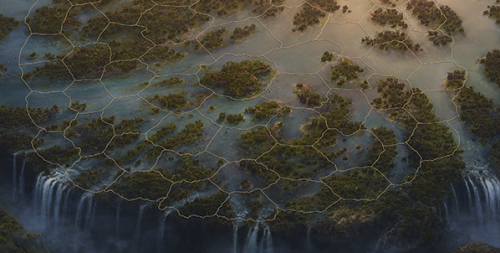
| El Archipiélago Cascada es el segundo mapa de los Campos de Batalla del Gremio. Se estrenó en diciembre de 2021 y su puesta en escena consiste en un impresionante archipiélago de pequeñas islas situadas a lo alto de una enorme cascada en lugar de las rocas y fuego del primer campo de batalla. | | El Archipiélago Cascada es el segundo mapa de los [[Campos_de_Batalla_del_Gremio|Campos de Batalla del Gremio]]. Se estrenó en diciembre de 2021 y su puesta en escena consiste en un impresionante archipiélago de pequeñas islas situadas a lo alto de una enorme cascada en lugar de las rocas y fuego del primer campo de batalla. |
|
| |
|
| The Waterfall Archipelago is the second [[Guild_Battlegrounds|Guild Battleground]] map. It went live in December 2021 and the setting is a really stunning Archipelago of small islands on top of a great waterfall instead of the fire and rock settings of the first battleground.
| | === Distribución del mapa === |
| | |
| === Distribución del Mapa === | |
|
| |
|
| [[FILE:Spawn points.png|left|200px|link=]] | | [[FILE:Spawn points.png|left|200px|link=]] |
| The size of the Map is basically the same as before but the Sectors are in hexagonal shape which increases the difficulty level since there are now up to six attack paths to some of them.
| | El tamaño del mapa es básicamente el mismo que el anterior, pero los sectores tienen forma hexagonal. Esto incrementa la dificultad ya que pueden haber hasta seis caminos para atacar a un sector. |
| <br><br><br><br><br><br><br><br><br><br> | | <br><br><br><br><br><br><br><br><br><br> |
|
| |
|
| === Recompensas ===
| | {{:Recompensas Archipiélago cascada}} |
| You can obtain immediate, temporary and permanent rewards in the Battlegrounds. There's a chance to obtain Forge Points, units, attackers boosts, goods, diamonds and fragments for The Great Elephant after each fight or negotiation. The magnitude of these rewards depends on your league! Your guild should gain temporary prestige points according to its current league, but keep in mind that you can also lose them likewise when dropping in the league. Lastly, we also have permanent rewards for you and your guild: Guilds can get guild power according to their placement within a battleground (the amount also scales according to the league), and simultaneously you can get fragments for The Great Elephant Selection Kit.
| |
| | |
| [[FILE:GBGRewards6.png|center|link=]]
| |
| | |
| === Recompensas de Gremio ===
| |
| | |
| | |
| {| | |
| ! style="text-align: center;" Rowspan="2" | {{sized-external-image|25px|https://foemx.innogamescdn.com/assets/shared/icons/rank.png}} Rank
| |
| ! style="text-align: center;" Colspan="2" | {{sized-external-image|25px|https://foemx.innogamescdn.com/assets/guild_battlegrounds/hud/guild_battlegrounds_league_copper.png}} Copper
| |
| ! style="text-align: center;" Colspan="2" | {{sized-external-image|25px|https://foemx.innogamescdn.com/assets/guild_battlegrounds/hud/guild_battlegrounds_league_silver.png}} Silver
| |
| ! style="text-align: center;" Colspan="2" | {{sized-external-image|25px|https://foemx.innogamescdn.com/assets/guild_battlegrounds/hud/guild_battlegrounds_league_gold.png}} Gold
| |
| |-
| |
| ! style="text-align: center;" | {{sized-external-image|25px|https://foemx.innogamescdn.com/assets/shared/icons/icon_fragment.png}} Fragments of TGE
| |
| ! style="text-align: center;" | {{sized-external-image|25px|https://foemx.innogamescdn.com/assets/shared/icons/clan_power.png}} Power
| |
| ! style="text-align: center;" | {{sized-external-image|25px|https://foemx.innogamescdn.com/assets/shared/icons/icon_fragment.png}} Fragments of TGE
| |
| ! style="text-align: center;" | {{sized-external-image|25px|https://foemx.innogamescdn.com/assets/shared/icons/clan_power.png}} Power
| |
| ! style="text-align: center;" | {{sized-external-image|25px|https://foemx.innogamescdn.com/assets/shared/icons/icon_fragment.png}} Fragments of TGE
| |
| ! style="text-align: center;" | {{sized-external-image|25px|https://foemx.innogamescdn.com/assets/shared/icons/clan_power.png}} Power
| |
| |-
| |
| | style="text-align: left;" | 1 {{sized-external-image|25px|https://foemx.innogamescdn.com/assets/shared/icons/reward_icons/reward_icon_guild_battlegrounds_chest_1.png}}
| |
| | style="text-align: right;" | 13
| |
| | style="text-align: right;" | 54600
| |
| | style="text-align: right;" | 26
| |
| | style="text-align: right;" | 109200
| |
| | style="text-align: right;" | 39
| |
| | style="text-align: right;" | 163800
| |
| |-
| |
| | style="text-align: left;" | 2 {{sized-external-image|25px|https://foemx.innogamescdn.com/assets/shared/icons/reward_icons/reward_icon_guild_battlegrounds_chest_2.png}}
| |
| | style="text-align: right;" | 12
| |
| | style="text-align: right;" | 47900
| |
| | style="text-align: right;" | 23
| |
| | style="text-align: right;" | 95700
| |
| | style="text-align: right;" | 35
| |
| | style="text-align: right;" | 143500
| |
| |-
| |
| | style="text-align: left;" | 3 {{sized-external-image|25px|https://foemx.innogamescdn.com/assets/shared/icons/reward_icons/reward_icon_guild_battlegrounds_chest_3.png}}
| |
| | style="text-align: right;" | 11
| |
| | style="text-align: right;" | 43,300
| |
| | style="text-align: right;" | 21
| |
| | style="text-align: right;" | 86500
| |
| | style="text-align: right;" | 31
| |
| | style="text-align: right;" | 129700
| |
| |-
| |
| | style="text-align: left;" | 4 {{sized-external-image|25px|https://foemx.innogamescdn.com/assets/shared/icons/reward_icons/reward_icon_guild_battlegrounds_chest_4.png}}
| |
| | style="text-align: right;" | 10
| |
| | style="text-align: right;" | 40,800
| |
| | style="text-align: right;" | 20
| |
| | style="text-align: right;" | 81500
| |
| | style="text-align: right;" | 30
| |
| | style="text-align: right;" | 122300
| |
| |-
| |
| | style="text-align: left;" | 5 {{sized-external-image|25px|https://foemx.innogamescdn.com/assets/shared/icons/reward_icons/reward_icon_guild_battlegrounds_chest_5.png}}
| |
| | style="text-align: right;" | 10
| |
| | style="text-align: right;" | 40,400
| |
| | style="text-align: right;" | 20
| |
| | style="text-align: right;" | 80700
| |
| | style="text-align: right;" | 29
| |
| | style="text-align: right;" | 121000
| |
| |-
| |
| | style="text-align: left;" | 6 {{sized-external-image|25px|https://foemx.innogamescdn.com/assets/shared/icons/reward_icons/reward_icon_guild_battlegrounds_chest_6.png}}
| |
| | style="text-align: right;" | 10
| |
| | style="text-align: right;" | 39,900
| |
| | style="text-align: right;" | 19
| |
| | style="text-align: right;" | 79800
| |
| | style="text-align: right;" | 29
| |
| | style="text-align: right;" | 119700
| |
| |-
| |
| | style="text-align: left;" | 7 {{sized-external-image|25px|https://foemx.innogamescdn.com/assets/shared/icons/reward_icons/reward_icon_guild_battlegrounds_chest_7.png}}
| |
| | style="text-align: right;" | 10
| |
| | style="text-align: right;" | 39,500
| |
| | style="text-align: right;" | 19
| |
| | style="text-align: right;" | 79000
| |
| | style="text-align: right;" |29
| |
| | style="text-align: right;" | 118500
| |
| |-
| |
| | style="text-align: left;" | 8 {{sized-external-image|25px|https://foemx.innogamescdn.com/assets/shared/icons/reward_icons/reward_icon_guild_battlegrounds_chest_8.png}}
| |
| | style="text-align: right;" | 10
| |
| | style="text-align: right;" | 39,100
| |
| | style="text-align: right;" | 19
| |
| | style="text-align: right;" | 78200
| |
| | style="text-align: right;" | 28
| |
| | style="text-align: right;" | 117200
| |
| |}
| |
| | |
| | |
| | |
| | |
| {|
| |
| ! style="text-align: center;" Rowspan="2" | {{sized-external-image|25px|https://foemx.innogamescdn.com/assets/shared/icons/rank.png}} Rank
| |
| ! style="text-align: center;" Colspan="3" | {{sized-external-image|25px|https://foemx.innogamescdn.com/assets/guild_battlegrounds/hud/guild_battlegrounds_league_platinum.png}} Platinum
| |
| ! style="text-align: center;" Colspan="3" | {{sized-external-image|25px|https://foemx.innogamescdn.com/assets/guild_battlegrounds/hud/guild_battlegrounds_league_diamond.png}} Diamond
| |
| |-
| |
| ! style="text-align: center;" | {{sized-external-image|25px|https://foemx.innogamescdn.com/assets/shared/icons/icon_fragment.png}} Fragments of TGE
| |
| ! style="text-align: center;" | {{sized-external-image|25px|https://foemx.innogamescdn.com/assets/shared/icons/icon_fragment.png}} Fragments of IG
| |
| ! style="text-align: center;" | {{sized-external-image|25px|https://foemx.innogamescdn.com/assets/shared/icons/clan_power.png}} Power
| |
| |-
| |
| | style="text-align: left;" | 1 {{sized-external-image|25px|https://foemx.innogamescdn.com/assets/shared/icons/reward_icons/reward_icon_guild_battlegrounds_chest_1.png}}
| |
| | style="text-align: right;" | 52
| |
| | style="text-align: right;" | 48
| |
| | style="text-align: right;" | 218400
| |
| | style="text-align: right;" | 78
| |
| | style="text-align: right;" | 72
| |
| | style="text-align: right;" | 327600
| |
| |-
| |
| | style="text-align: left;" | 2 {{sized-external-image|25px|https://foemx.innogamescdn.com/assets/shared/icons/reward_icons/reward_icon_guild_battlegrounds_chest_2.png}}
| |
| | style="text-align: right;" | 46
| |
| | style="text-align: right;" | 40
| |
| | style="text-align: right;" | 191300
| |
| | style="text-align: right;" | 62
| |
| | style="text-align: right;" | 52
| |
| | style="text-align: right;" | 287000
| |
| |-
| |
| | style="text-align: left;" | 3 {{sized-external-image|25px|https://foemx.innogamescdn.com/assets/shared/icons/reward_icons/reward_icon_guild_battlegrounds_chest_3.png}}
| |
| | style="text-align: right;" | 42
| |
| | style="text-align: right;" | 35
| |
| | style="text-align: right;" | 172900
| |
| | style="text-align: right;" | 62
| |
| | style="text-align: right;" | 52
| |
| | style="text-align: right;" | 259400
| |
| |-
| |
| | style="text-align: left;" | 4 {{sized-external-image|25px|https://foemx.innogamescdn.com/assets/shared/icons/reward_icons/reward_icon_guild_battlegrounds_chest_4.png}}
| |
| | style="text-align: right;" | 39
| |
| | style="text-align: right;" | 31
| |
| | style="text-align: right;" | 163000
| |
| | style="text-align: right;" | 59
| |
| | style="text-align: right;" | 46
| |
| | style="text-align: right;" | 244500
| |
| |-
| |
| | style="text-align: left;" | 5 {{sized-external-image|25px|https://foemx.innogamescdn.com/assets/shared/icons/reward_icons/reward_icon_guild_battlegrounds_chest_5.png}}
| |
| | style="text-align: right;" | 39
| |
| | style="text-align: right;" | 29
| |
| | style="text-align: right;" | 161300
| |
| | style="text-align: right;" | 58
| |
| | style="text-align: right;" | 43
| |
| | style="text-align: right;" | 242000
| |
| |-
| |
| | style="text-align: left;" | 6 {{sized-external-image|25px|https://foemx.innogamescdn.com/assets/shared/icons/reward_icons/reward_icon_guild_battlegrounds_chest_6.png}}
| |
| | style="text-align: right;" | 38
| |
| | style="text-align: right;" | 27
| |
| | style="text-align: right;" | 159600
| |
| | style="text-align: right;" | 57
| |
| | style="text-align: right;" | 40
| |
| | style="text-align: right;" | 239400
| |
| |-
| |
| | style="text-align: left;" | 7 {{sized-external-image|25px|https://foemx.innogamescdn.com/assets/shared/icons/reward_icons/reward_icon_guild_battlegrounds_chest_7.png}}
| |
| | style="text-align: right;" | 38
| |
| | style="text-align: right;" | 24
| |
| | style="text-align: right;" | 158000
| |
| | style="text-align: right;" | 57
| |
| | style="text-align: right;" | 37
| |
| | style="text-align: right;" | 236900
| |
| |-
| |
| | style="text-align: left;" | 8 {{sized-external-image|25px|https://foemx.innogamescdn.com/assets/shared/icons/reward_icons/reward_icon_guild_battlegrounds_chest_8.png}}
| |
| | style="text-align: right;" | 38
| |
| | style="text-align: right;" | 23
| |
| | style="text-align: right;" | 156300
| |
| | style="text-align: right;" | 56
| |
| | style="text-align: right;" | 34
| |
| | style="text-align: right;" | 234400
| |
| |}
| |
| | |
| | |
| | |
| | |
| ==== The Great Elephant ====
| |
| | |
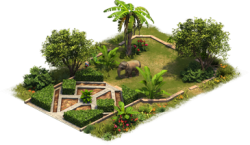
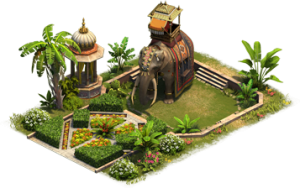
| The Great Elephant is a 4x3 building, upgradeable up to 8 levels. As you upgrade it, you will receive different bonuses including: a coin production bonus, forge points, as well as goods to the Guild treasury and an increase in Guild Power! Lastly, and most importantly, there is also an attacking bonus for your attacking armies!
| |
| | |
| | |
| On its eighth and final level, you will met with a choice. A choice which reflects the variety of roles the elephant has held throughout the ages. Will you choose to employ your Great Elephant in battle, trade, or support? With these three brancheable choices; the decision is very much in your hands!
| |
| | |
| '''Note:''' 50% of the time, the immediate reward will be one fragment for the The Great Elephant Selection kit.
| |
| | |
| | |
| {|
| |
| ! style="text-align: center; width: 20%;" | [[The Great Elephant - Lv. 1]]
| |
| ! style="text-align: center; width: 20%;" | [[The Great Elephant - Lv. 2]]
| |
| ! style="text-align: center; width: 20%;" | [[The Great Elephant - Lv. 3]]
| |
| ! style="text-align: center; width: 20%;" | [[The Great Elephant - Lv. 4]]
| |
| |-
| |
| | {{sized-external-image|175px|https://foemx.innogamescdn.com/assets/city/buildings/R_SS_MultiAge_Battlegrounds3a-586f50f92.png}}
| |
| | {{sized-external-image|175px|https://foemx.innogamescdn.com/assets/city/buildings/R_SS_MultiAge_Battlegrounds3b-7a829efbc.png}}
| |
| | {{sized-external-image|175px|https://foemx.innogamescdn.com/assets/city/buildings/R_SS_MultiAge_Battlegrounds3c-e287d1a8d.png}}
| |
| | {{sized-external-image|175px|https://foemx.innogamescdn.com/assets/city/buildings/R_SS_MultiAge_Battlegrounds3d-567f03961.png}}
| |
| |}
| |
| {|
| |
| ! style="text-align: center; width: 20%;" | [[The Great Elephant - Lv. 5]]
| |
| ! style="text-align: center; width: 20%;" | [[The Great Elephant - Lv. 6]]
| |
| ! style="text-align: center; width: 20%;" | [[The Great Elephant - Lv. 7]]
| |
| |-
| |
| | {{sized-external-image|175px|https://foemx.innogamescdn.com/assets/city/buildings/R_SS_MultiAge_Battlegrounds3e-b6eb4cbc1.png}}
| |
| | {{sized-external-image|175px|https://foemx.innogamescdn.com/assets/city/buildings/R_SS_MultiAge_Battlegrounds3f-d01d0b7b2.png}}
| |
| | {{sized-external-image|175px|https://foemx.innogamescdn.com/assets/city/buildings/R_SS_MultiAge_Battlegrounds3g-dc26791b7.png}}
| |
| |}
| |
| {|
| |
| ! style="text-align: center; width: 20%;" | [[The Elephant's Bazaar]]
| |
| ! style="text-align: center; width: 20%;" | [[The Elephant's Citadel]]
| |
| ! style="text-align: center; width: 20%;" | [[The Elephant's Royalty]]
| |
| |-
| |
| | {{sized-external-image|175px|https://foemx.innogamescdn.com/assets/city/buildings/R_SS_MultiAge_Battlegrounds3hBazaar-ce1975527.png}}
| |
| | {{sized-external-image|175px|https://foemx.innogamescdn.com/assets/city/buildings/R_SS_MultiAge_Battlegrounds3f-d01d0b7b2.png}}
| |
| | {{sized-external-image|175px|https://foemx.innogamescdn.com/assets/city/buildings/R_SS_MultiAge_Battlegrounds3g-dc26791b7.png}}
| |
| |}
| |
| | |
| ==== Iridescent Garden ====
| |
| | |
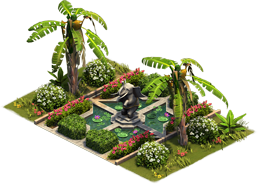
| Chain Building Addition - Iridescent Garden
| |
| | |
| Yet, that is not all you can win from a successful campaign! Indeed, diamonds and platinum league Guild participants can also win fragments of the Iridescent garden. With enough fragments, you can construct one of three possible appearances for the building, and bolster the stats of your Great Elephant!
| |
| | |
| {|
| |
| ! style="text-align: center;" Colspan="3" |[[Iridescent Garden]]
| |
| |-
| |
| ! style="text-align: center;" |[[File:D SS MultiAge Battlegrounds4.png]]
| |
| ! style="text-align: center;" |[[File:D SS MultiAge Battlegrounds4b.png]]
| |
| ! style="text-align: center;" |[[File:D SS MultiAge Battlegrounds4c.png]]
| |
| |-
| |
| ! style="text-align: center;" Colspan="3" | Once connected it provides Happiness Bonus,Defensive boost for the attacker,3 Goods,1 Forge Point
| |
| |-
| |
| |}
| |
| | |
| | |
| Important tips - As this is a chain building, it will need to be connected to the Great Elephant to receive certain bonuses.
| |
| | |
| ==== Personal Rewards ====
| |
| | |
| Besides fragments to great elephant selection kits, you will find Diamonds, Forge Points, Goods, Units,coins, Supplies, attacker boost among the personal rewards in this battleground
| |
Historia
El Archipiélago Cascada es el segundo mapa de los Campos de Batalla del Gremio. Se estrenó en diciembre de 2021 y su puesta en escena consiste en un impresionante archipiélago de pequeñas islas situadas a lo alto de una enorme cascada en lugar de las rocas y fuego del primer campo de batalla.
Distribución del mapa
El tamaño del mapa es básicamente el mismo que el anterior, pero los sectores tienen forma hexagonal. Esto incrementa la dificultad ya que pueden haber hasta seis caminos para atacar a un sector.
Recompensas del Archipiélago cascada
Tu gremio podría ganar puntos de prestigio temporales de acuerdo a su liga actual, pero ten en mente que también se pueden perder si se desciende de liga. También tenemos recompensas permanentes para ti y tu gremio: Los gremios pueden obtener poder acorde a la posición en la que finalicen el Campo de batallas (la cantidad también depende de la liga) y, simultáneamente, ¡puedes obtener fragmentos para el kit de selección del Gran elefante donde podrás elegir entre el nivel 1 del Gran elefante, un Kit de selección del Gran Elefante o una pieza de cadena del Jardín Iridiscente!
Recompensas de gremio

Rank
|

Cobre
|

Plata
|

Oro
|

Platino
|

Diamante
|

Fragmentos Kit Selección Gran Elefante
|

Poder
|
Fragmentos Kit Selección Gran Elefante
|
Poder
|
Fragmentos Kit Selección Gran Elefante
|
Poder
|
Fragmentos Kit Selección Gran Elefante
|
Poder
|
Fragmentos Torre de Campeones
|
Fragmentos Kit Selección Gran Elefante
|
Poder
|
1 
|
50
|
54,600
|
100
|
163,800
|
125
|
273,000
|
150
|
382.200
|
3000
|
200
|
546.000
|
2 
|
40
|
47.900
|
80
|
143,500
|
100
|
239,000
|
120
|
334,800
|
1000
|
160
|
478,200
|
3 
|
38
|
43,300
|
75
|
129,700
|
94
|
216,100
|
113
|
302,600
|
500
|
150
|
432,200
|
4 
|
35
|
40,800
|
70
|
122,300
|
88
|
203,000
|
105
|
285,200
|
0
|
140
|
407,400
|
5 
|
33
|
40,400
|
65
|
121,000
|
81
|
201,600
|
98
|
282,300
|
0
|
130
|
403,200
|
6 
|
30
|
39,900
|
60
|
119,700
|
75
|
199,000
|
90
|
279,300
|
0
|
120
|
399,000
|
7 
|
28
|
39,500
|
55
|
118,500
|
69
|
197,400
|
83
|
276,400
|
0
|
110
|
394,800
|
8 
|
25
|
39,100
|
50
|
117,200
|
63
|
195,300
|
75
|
273,500
|
0
|
100
|
390,600
|
El Gran Elefante
El gran elefante es un edificio de dimensiones 4x3, que se puede mejorar con 8 niveles. A medida que lo mejoras, recibirás diferentes bonos que incluyen: mejora de producción de monedas, Forge Points, bienes para la tesorería del gremio y un incremento de poder del gremio. Por último, y más importante, ¡también viene con una mejora de ataque para tus unidades atacantes!
En su octavo y último nivel, tendrás que tomar una decisión. Una decisión que refleja la variedad de roles que el elefante ha tenido durante eras. ¿Preferirás usar tu elefante en batalla, para comerciar o para prestar ayuda? Con estas tres opciones, ¡la decisión estará en tus manos!
El Gran Elefante es un edificio especial que se entrega como recompensa en el mapa Archipiélago cascada de los Campos de Batalla de Gremio.
Jardín iridiscente
Edificio encadenado - Jardín iridiscente
Podrás construir una de los tres modelos posibles para este edificio, ¡incrementando así el rendimiento del Gran elefante!
| Jardín Iridiscente
|

|

|
|
| Aporta al conectarse bono de felicidad, mejoras de defensa para unidades atacantes, 3 bienes y 1 Forge Point
|
Consejo importante: Ya que este es un edificio encadenado, necesitará estar conectado al Gran elefante para poder aportar ciertas bonificaciones.
Recompensas personales
Además de las recompensas para el gremio, también obtendrás recompensas individuales, cuando contribuyes luchando o negociando, hay una posibilidad de ganar algunos Forge Points, Bienes, Unidades militares, Suministros o incluso Diamantes.
Nota: El 40% de las ocasiones, la recompensa inmediata será un fragmento de Kit de selección de Gran Elefante o, en Liga Diamante, 15% de 3 fragmentos y 25 % de 1 fragmento de Guild Arena.