Diferencia entre revisiones de «Evento del Día de San Patricio 2022»
Sin resumen de edición |
Sin resumen de edición |
||
| Línea 1: | Línea 1: | ||
[[File: | [[File:STPATRICK_Loading_Screen.png|center|link=]]<br> | ||
<center><font color=#008000>''' | <center><font color=#008000>'''"Hello Friend! Top of the mornin' to ya! St. Patrick's Day is almost upon us and you must be the one who's come to help us get'''<br> | ||
'''ready for the big festivities... would I be right?"''' | |||
</font></center>''<br>'' | </font></center>''<br>'' | ||
__TOC__<br> | [[File:StPatricksmain.png|300px|link=|left]]<br> __TOC__<br> | ||
The St. Patrick's Day Event introduced a brand new and unique way to collect some awesome avatars, achievements and buildings as rewards, with a completely new event mechanic. Your task is to help the townsfolk prepare for the momentous occasion, and looking at it, you've got your work cut out for you! Paddy McCharms is the festival's guide, so be sure to listen to him as he shows you around town, introducing you to the townsfolk who will aid you in your quest to throw the best St. Patrick's Day festival ever! | |||
== | ==How can I participate in the St. Patrick's day event?== | ||
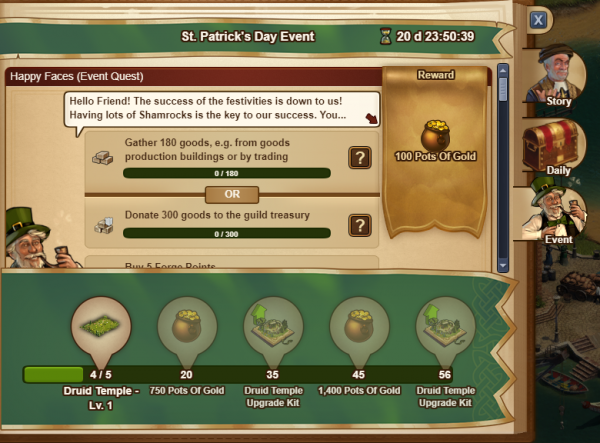
You need to complete quests to earn Pots of Gold. There are 56 quests to complete, 35 rush quests, and then 1 quest for each day of the event. You can also find even more Pots of Gold in incidents around your city. Use the Pots of Gold in the main event window to prepare for the celebrations. You can also purchase additional Pots of Gold for Diamonds if you need some more. | |||
[[File: | |||
[[File:QuestlinePatricks.png|600px|link=]]<br> | |||
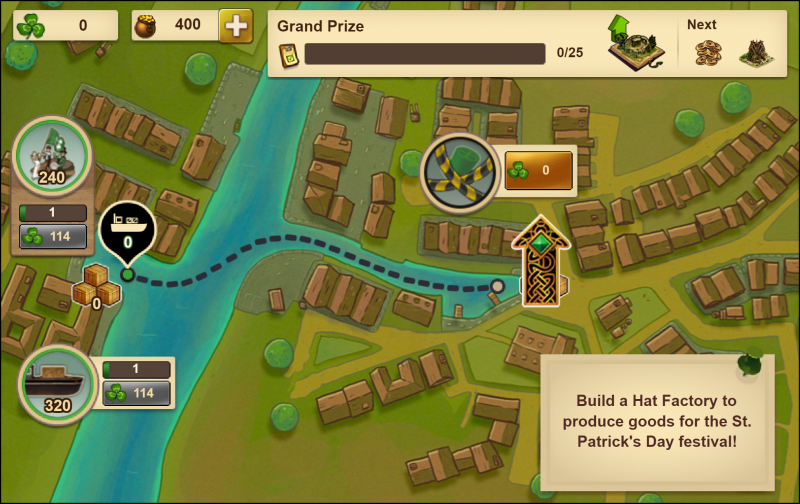
Upon opening the event window, you'll see a map of the town. On the left hand side you have the festival. Towards the center, you'll see one of the town's factories. Click on this to start producing goods for use in the festival. Once the production is complete, they'll put the goods in containers ready for collection. Click on the ferry in the bottom left corner to send it to collect goods from the town, and deliver them to the festival. Once the ferry arrives back at the festival, click on it to collect the goods, and earn yourself some Shamrocks! | |||
[[File:Maineventwindow.png|800px|center|link=]]<br> | |||
===Map=== | |||
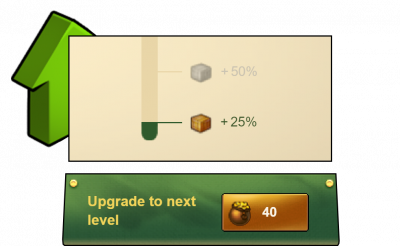
Use these newly earned Shamrocks [[File:Stpatrick icon idlecurrency.png|link=|25px]] to upgrade your factories, improving your output, and maximizing production. You can also upgrade your ferry, as well as the festival itself, to increase the amount of goods the ferry can carry across the river, as well as how quickly the festival can use the delivered goods. If you've gathered a lot of Shamrocks [[File:Stpatrick icon idlecurrency.png|link=|25px]], and don't want to upgrade the productions incrementally, tick the 'max' button in the top left corner to upgrade them much faster! Also, if you want to, you can spend Pots of Gold [[File:Stpatrick image currency event.png|link=|25px]] to advance your productions instantly by 2, 4 or 8 hours. This is a quick way to produce additional Shamrocks if you need them. | |||
To help you get off to a good start you can also read our [[St. Patrick's Day Event - Getting started|Getting started guide]] | |||
=== | [[File:PaddiesGIF2.gif|center|link=]]<br> | ||
But micromanaging these factories isn't all you can do. Paddy has a suggestion to make your life so much easier! He'll introduce you to some fine young folk who, for a fee, will manage your factories. Click on the top hat ([[File:tinyhat.png|25px|link=]]) to hire a manager for Pots of Gold. Hiring a manager not only gives you the opportunity to improve your factories output, but also automates the production of goods, meaning you don't have to click on your factory anymore! You can also hire a Festival Manager, to automatically manage the festival on your behalf, and a Shipyard Manager, to automate the shipment of goods to the festival. | |||
[[File:manager2patricks.png|400px|center|link=]] | |||
=== The festival === | |||
{| style="width: 100%; | {| style="width: 100%; | ||
!style="text-align: center; font-weight: bold; background-color:#145E3D;" |[[File: | !style="text-align: center; font-weight: bold; background-color:#145E3D;" |[[File:stpatrick_image_building_parades.png|link=|100px]] | ||
| style="text-align:center;"| | | style="text-align:center;"|The festival is where you sell all your goods and gets shamrocks [[File:Stpatrick icon idlecurrency.png|link=|25px]]in return. The festival is across the river from the factories, so it is necessary to transport the goods across the river by boat. Once across the goods will be stored until you or your manager can sell them.<br> | ||
|} | |} | ||
=== | === The Shipyard === | ||
{| style="width: 100%; | {| style="width: 100%; | ||
!style="text-align: center; font-weight: bold; background-color:#145E3D;" |[[File: | !style="text-align: center; font-weight: bold; background-color:#145E3D;" |[[File:stpatrick_image_building_ship.png|link=|100px]] | ||
|style="text-align:center;"| | |style="text-align:center;"|The Shipyard is where you maintain and expand your Ferry. This costs shamrocks [[File:Stpatrick icon idlecurrency.png|link=|25px]]. The more you upgrade your ferry, the more goods it can transport across the river and the faster it sails. <br> | ||
|} | |} | ||
=== | === Goods buildings === | ||
There are five different goods buildings. Each produces different amounts of festival goods. The Hat factory is available immediately when the event starts, and the other four can be unlocked by spending shamrocks [[File:Stpatrick icon idlecurrency.png|link=|25px]]. | |||
When a building becomes available it will be at level 1. You can use shamrocks to increase the production in your buildings. | |||
While every single level will increase the production of your building, reaching certain tiers will unlock production multipliers. | |||
{| style="width: 40%; | {| style="width: 40%; | ||
!style="text-align: center; font-weight: bold; background-color:#145E3D;"| | !style="text-align: center; font-weight: bold; background-color:#145E3D;"|Levels | ||
!style="text-align: center; font-weight: bold; background-color:#145E3D;"| | !style="text-align: center; font-weight: bold; background-color:#145E3D;"|Multiplier | ||
|- | |- | ||
!style="text-align: center; font-weight: bold;"|1-10 | !style="text-align: center; font-weight: bold;"|1-10 | ||
| Línea 63: | Línea 71: | ||
|- | |- | ||
|} | |} | ||
{| style="width: 50%; | {| style="width: 50%; | ||
!style="text-align: center; font-weight: bold; background-color:#145E3D;"| | !style="text-align: center; font-weight: bold; background-color:#145E3D;"|Building | ||
!style="text-align: center; font-weight: bold; background-color:#145E3D;"| | !style="text-align: center; font-weight: bold; background-color:#145E3D;"|Description | ||
!style="text-align: center; font-weight: bold; background-color:#145E3D;"| | !style="text-align: center; font-weight: bold; background-color:#145E3D;"|Cost to unlock. <br> | ||
|- | |- | ||
!style="text-align: center; font-weight: bold; background-color:#145E3D;" |[[File: | !style="text-align: center; font-weight: bold; background-color:#145E3D;" |[[File:stpatrick_image_building_hatfactory.png|link=|100px]] | ||
|style="text-align:center;"| | |style="text-align:center;"|Hat factory. | ||
|style="text-align: center; font-weight: bold;"| | |style="text-align: center; font-weight: bold;"|Free <br> | ||
|- | |- | ||
!style="text-align: center; font-weight: bold; background-color:#145E3D;" |[[File: | !style="text-align: center; font-weight: bold; background-color:#145E3D;" |[[File:stpatrick_image_building_flowersfactory.png|link=|100px]] | ||
|style="text-align:center;"| | |style="text-align:center;"|Flower factory. | ||
|style="text-align: center; font-weight: bold;"|1.1K | |style="text-align: center; font-weight: bold;"|1.1K [[File:Stpatrick icon idlecurrency.png|link=|25px]] <br> | ||
|- | |- | ||
!style="text-align: center; font-weight: bold; background-color:#145E3D;" |[[File: | !style="text-align: center; font-weight: bold; background-color:#145E3D;" |[[File:stpatrick_image_building_cakefactory.png|link=|100px]] | ||
|style="text-align:center;"| | |style="text-align:center;"|Cake factory. | ||
|style="text-align: center; font-weight: bold;"|1.2M | |style="text-align: center; font-weight: bold;"|1.2M [[File:Stpatrick icon idlecurrency.png|link=|25px]] <br> | ||
|- | |- | ||
!style="text-align: center; font-weight: bold; background-color:#145E3D;" |[[File: | !style="text-align: center; font-weight: bold; background-color:#145E3D;" |[[File:stpatrick_image_building_factory.png|link=|100px]] | ||
|style="text-align:center;"| | |style="text-align:center;"|Drinks factory. | ||
|style="text-align: center; font-weight: bold;"|1.5B | |style="text-align: center; font-weight: bold;"|1.5B [[File:Stpatrick icon idlecurrency.png|link=|25px]]<br> | ||
|- | |- | ||
!style="text-align: center; font-weight: bold; background-color:#145E3D;" |[[File: | !style="text-align: center; font-weight: bold; background-color:#145E3D;" |[[File:stpatrick_image_building_firefactory.png|link=|100px]] | ||
|style="text-align:center;"| | |style="text-align:center;"|Fireworks factory | ||
|style="text-align: center; font-weight: bold;"|111B | |style="text-align: center; font-weight: bold;"|111B [[File:Stpatrick icon idlecurrency.png|link=|25px]] <br> | ||
|} | |} | ||
=== | === Managers === | ||
Click on the top hat to hire a manager for Pots of Gold. Hiring a manager automates the productions of goods, meaning you don't have to click on your factory anymore. And not only that, it will also improve the factory's output even further! Hire a Festival Manager to automatically manage the festival on your behalf, and a Shipyard Manager, to automate the shipment of goods to the festival. | |||
{| style="width: 100%; | {| style="width: 100%; | ||
!style="text-align: center; font-weight: bold; background-color:#145E3D;"| | !style="text-align: center; font-weight: bold; background-color:#145E3D;"|Levels | ||
!style="text-align: center; font-weight: bold; background-color:#145E3D;"|[[File:Stpatrick image manager market.png|link=|100px]] | !style="text-align: center; font-weight: bold; background-color:#145E3D;"|[[File:Stpatrick image manager market.png|link=|100px]]Festival Manager | ||
!style="text-align: center; font-weight: bold; background-color:#145E3D;"|[[File:Stpatrick image manager transport.png|link=|100px]] | !style="text-align: center; font-weight: bold; background-color:#145E3D;"|[[File:Stpatrick image manager transport.png|link=|100px]] Shipyard Manager | ||
!style="text-align: center; font-weight: bold; background-color:#145E3D;"|[[File:Stpatrick image manager hats.png|link=|100px]] | !style="text-align: center; font-weight: bold; background-color:#145E3D;"|[[File:Stpatrick image manager hats.png|link=|100px]] Hat factory Manager | ||
!style="text-align: center; font-weight: bold; background-color:#145E3D;"|[[File:stpatrick_image_manager_flowers.png|link=|100px]] | !style="text-align: center; font-weight: bold; background-color:#145E3D;"|[[File:stpatrick_image_manager_flowers.png|link=|100px]]Flower factory Manager | ||
!style="text-align: center; font-weight: bold; background-color:#145E3D;"|[[File:Stpatrick image manager cakes.png|link=|100px]] | !style="text-align: center; font-weight: bold; background-color:#145E3D;"|[[File:Stpatrick image manager cakes.png|link=|100px]]Cake factory Manager | ||
!style="text-align: center; font-weight: bold; background-color:#145E3D;"|[[File:Stpatrick image manager factory.png|link=|100px]] | !style="text-align: center; font-weight: bold; background-color:#145E3D;"|[[File:Stpatrick image manager factory.png|link=|100px]]Drink factory Manager | ||
!style="text-align: center; font-weight: bold; background-color:#145E3D;"|[[File:Stpatrick image manager fireworks.png|link=|100px]] | !style="text-align: center; font-weight: bold; background-color:#145E3D;"|[[File:Stpatrick image manager fireworks.png|link=|100px]]Fireworks factory Manager<br> | ||
|- | |- | ||
!style="text-align: center; font-weight: bold; background-color:#145E3D;"| | !style="text-align: center; font-weight: bold; background-color:#145E3D;"|Level 1 | ||
!style="text-align: center; font-weight: bold;"|20[[File:Stpatrick image currency event.png|link=|link=|25px]] | !style="text-align: center; font-weight: bold;"|20[[File:Stpatrick image currency event.png|link=|link=|25px]] | ||
!style="text-align: center; font-weight: bold;"|20[[File:Stpatrick image currency event.png|link=|link=|25px]] | !style="text-align: center; font-weight: bold;"|20[[File:Stpatrick image currency event.png|link=|link=|25px]] | ||
| Línea 115: | Línea 124: | ||
!style="text-align: center; font-weight: bold;"|50[[File:Stpatrick image currency event.png|link=|link=|25px]] | !style="text-align: center; font-weight: bold;"|50[[File:Stpatrick image currency event.png|link=|link=|25px]] | ||
|- | |- | ||
!style="text-align: center; font-weight: bold;background-color:#145E3D;"| | !style="text-align: center; font-weight: bold;background-color:#145E3D;"|Level 2 | ||
!style="text-align: center; font-weight: bold;"|40[[File:Stpatrick image currency event.png|link=|link=|25px]] | !style="text-align: center; font-weight: bold;"|40[[File:Stpatrick image currency event.png|link=|link=|25px]] | ||
!style="text-align: center; font-weight: bold;"|40[[File:Stpatrick image currency event.png|link=|link=|25px]] | !style="text-align: center; font-weight: bold;"|40[[File:Stpatrick image currency event.png|link=|link=|25px]] | ||
| Línea 124: | Línea 133: | ||
!style="text-align: center; font-weight: bold;"|100[[File:Stpatrick image currency event.png|link=|link=|25px]] | !style="text-align: center; font-weight: bold;"|100[[File:Stpatrick image currency event.png|link=|link=|25px]] | ||
|- | |- | ||
!style="text-align: center; font-weight: bold;background-color:#145E3D;"| | !style="text-align: center; font-weight: bold;background-color:#145E3D;"|Level 3 | ||
!style="text-align: center; font-weight: bold;"|80[[File:Stpatrick image currency event.png|link=|25px]] | !style="text-align: center; font-weight: bold;"|80[[File:Stpatrick image currency event.png|link=|25px]] | ||
!style="text-align: center; font-weight: bold;"|80[[File:Stpatrick image currency event.png|link=|25px]] | !style="text-align: center; font-weight: bold;"|80[[File:Stpatrick image currency event.png|link=|25px]] | ||
| Línea 133: | Línea 142: | ||
!style="text-align: center; font-weight: bold;"|150[[File:Stpatrick image currency event.png|link=|25px]] | !style="text-align: center; font-weight: bold;"|150[[File:Stpatrick image currency event.png|link=|25px]] | ||
|- | |- | ||
!style="text-align: center; font-weight: bold;background-color:#145E3D;"| | !style="text-align: center; font-weight: bold;background-color:#145E3D;"|Level 4 | ||
!style="text-align: center; font-weight: bold;"|150[[File:Stpatrick image currency event.png|link=|25px]] | !style="text-align: center; font-weight: bold;"|150[[File:Stpatrick image currency event.png|link=|25px]] | ||
!style="text-align: center; font-weight: bold;"|150[[File:Stpatrick image currency event.png|link=|25px]] | !style="text-align: center; font-weight: bold;"|150[[File:Stpatrick image currency event.png|link=|25px]] | ||
| Línea 142: | Línea 151: | ||
!style="text-align: center; font-weight: bold;"|250[[File:Stpatrick image currency event.png|link=|25px]] | !style="text-align: center; font-weight: bold;"|250[[File:Stpatrick image currency event.png|link=|25px]] | ||
|- | |- | ||
!style="text-align: center; font-weight: bold;background-color:#145E3D;"| | !style="text-align: center; font-weight: bold;background-color:#145E3D;"|Level 5 | ||
!style="text-align: center; font-weight: bold;"|300[[File:Stpatrick image currency event.png|link=|25px]] | !style="text-align: center; font-weight: bold;"|300[[File:Stpatrick image currency event.png|link=|25px]] | ||
!style="text-align: center; font-weight: bold;"|300[[File:Stpatrick image currency event.png|link=|25px]] | !style="text-align: center; font-weight: bold;"|300[[File:Stpatrick image currency event.png|link=|25px]] | ||
| Línea 152: | Línea 161: | ||
|- | |- | ||
|} | |} | ||
== | == Next Town == | ||
Now this is all great, but what's in it for you? As you'll see, along the top of the event window, there are a list of three tasks. Completing a task will prompt you to collect the task, which will contribute progress towards your Grand Prize. Collect 25 tasks to earn the Grand Prize reward! If you're not sure what you need to do for a task, click on the arrow on the right side of the list for a full overview. Once you complete a task, click to collect it, and it will be replaced with a new task, allowing you to work towards more Grand Prize progress. | |||
[[File:Tasks.png|center|600px|link=]] | |||
Please note that you don't necessarily need to collect all tasks in order to proceed and unlock a new town. As soon as you gather 8.4 quadrillions of Shamrock, you can click in "continue" to advance and still keep your grand prize progress (in other words, the task progress). Once you've selected your stage prizes, the town progress will be reset and this gives you the chance to start the production over, and earn yourself even more Grand Prizes. | |||
[[File:Shamrockfinish.png|center|200px|link=]] | |||
This button will light up as soon as you have 8.4Q Shamrocks | |||
== Rewards == | |||
Eventually, however, Paddy won't have any more tasks for you to complete. Once you reach this point, click on the 'Next Stage' button in the bottom right to be presented with some end of stage reward boxes. With the Luck of the Irish, snag yourself some fantastic prizes from each box. You can open one container for free, and more containers for Pots of Gold. These costs will increase gradually the more boxes you open using Pots of Gold. Once you've collected all 6, you'll earn the collection reward at the top bar, and if you want, you can open a new set of 6 reward boxes before advancing to the next town. | |||
[[File:PatricksBox.png|center|600px|link=]] | |||
[[File: | |||
The table below details the cost of opening reward boxes from the end of stage collection screen. The costs continue to scale with each new set of 6 reward boxes. | |||
[[File: | |||
[[File: | |||
{| style="width: 100%; | {| style="width: 100%; | ||
!style="text-align: center; font-weight: bold; background-color:#145E3D;"| | !style="text-align: center; font-weight: bold; background-color:#145E3D;"|Reward Box | ||
!style="text-align: center; font-weight: bold; background-color:#145E3D;"| | !style="text-align: center; font-weight: bold; background-color:#145E3D;"|First | ||
!style="text-align: center; font-weight: bold; background-color:#145E3D;"| | !style="text-align: center; font-weight: bold; background-color:#145E3D;"|Second | ||
!style="text-align: center; font-weight: bold; background-color:#145E3D;"| | !style="text-align: center; font-weight: bold; background-color:#145E3D;"|Third | ||
|- | |- | ||
!style="text-align: center; font-weight: bold; background-color:#145E3D;"| | !style="text-align: center; font-weight: bold; background-color:#145E3D;"|Reward Box 1 | ||
!style="text-align: center; font-weight: bold;"|Free | !style="text-align: center; font-weight: bold;"|Free | ||
!style="text-align: center; font-weight: bold;"|50[[File:Stpatrick image currency event.png|link=|25px]] | !style="text-align: center; font-weight: bold;"|50[[File:Stpatrick image currency event.png|link=|25px]] | ||
!style="text-align: center; font-weight: bold;"|100[[File:Stpatrick image currency event.png|link=|25px]] | !style="text-align: center; font-weight: bold;"|100[[File:Stpatrick image currency event.png|link=|25px]] | ||
|- | |- | ||
!style="text-align: center; font-weight: bold;background-color:#145E3D;"| | !style="text-align: center; font-weight: bold;background-color:#145E3D;"|Reward Box 2 | ||
!style="text-align: center; font-weight: bold;"|50[[File:Stpatrick image currency event.png|link=|25px]] | !style="text-align: center; font-weight: bold;"|50[[File:Stpatrick image currency event.png|link=|25px]] | ||
!style="text-align: center; font-weight: bold;"|100[[File:Stpatrick image currency event.png|link=|25px]] | !style="text-align: center; font-weight: bold;"|100[[File:Stpatrick image currency event.png|link=|25px]] | ||
!style="text-align: center; font-weight: bold;"|250[[File:Stpatrick image currency event.png|link=|25px]] | !style="text-align: center; font-weight: bold;"|250[[File:Stpatrick image currency event.png|link=|25px]] | ||
|- | |- | ||
!style="text-align: center; font-weight: bold;background-color:#145E3D;"| | !style="text-align: center; font-weight: bold;background-color:#145E3D;"|Reward Box 3 | ||
!style="text-align: center; font-weight: bold;"|100[[File:Stpatrick image currency event.png|link=|25px]] | !style="text-align: center; font-weight: bold;"|100[[File:Stpatrick image currency event.png|link=|25px]] | ||
!style="text-align: center; font-weight: bold;"|250[[File:Stpatrick image currency event.png|link=|25px]] | !style="text-align: center; font-weight: bold;"|250[[File:Stpatrick image currency event.png|link=|25px]] | ||
!style="text-align: center; font-weight: bold;"|500[[File:Stpatrick image currency event.png|link=|25px]] | !style="text-align: center; font-weight: bold;"|500[[File:Stpatrick image currency event.png|link=|25px]] | ||
|- | |- | ||
!style="text-align: center; font-weight: bold; background-color:#145E3D;"| | !style="text-align: center; font-weight: bold; background-color:#145E3D;"|Reward Box 4 | ||
!style="text-align: center; font-weight: bold;"|250[[File:Stpatrick image currency event.png|link=|25px]] | !style="text-align: center; font-weight: bold;"|250[[File:Stpatrick image currency event.png|link=|25px]] | ||
!style="text-align: center; font-weight: bold;"|500[[File:Stpatrick image currency event.png|link=|25px]] | !style="text-align: center; font-weight: bold;"|500[[File:Stpatrick image currency event.png|link=|25px]] | ||
!style="text-align: center; font-weight: bold;"|1000[[File:Stpatrick image currency event.png|link=|25px]] | !style="text-align: center; font-weight: bold;"|1000[[File:Stpatrick image currency event.png|link=|25px]] | ||
|- | |- | ||
!style="text-align: center; font-weight: bold;background-color:#145E3D;"| | !style="text-align: center; font-weight: bold;background-color:#145E3D;"|Reward Box 5 | ||
!style="text-align: center; font-weight: bold;"|500[[File:Stpatrick image currency event.png|link=|25px]] | !style="text-align: center; font-weight: bold;"|500[[File:Stpatrick image currency event.png|link=|25px]] | ||
!style="text-align: center; font-weight: bold;"|1000[[File:Stpatrick image currency event.png|link=|25px]] | !style="text-align: center; font-weight: bold;"|1000[[File:Stpatrick image currency event.png|link=|25px]] | ||
!style="text-align: center; font-weight: bold;"|2000[[File:Stpatrick image currency event.png|link=|25px]] | !style="text-align: center; font-weight: bold;"|2000[[File:Stpatrick image currency event.png|link=|25px]] | ||
|- | |- | ||
!style="text-align: center; font-weight: bold;background-color:#145E3D;"| | !style="text-align: center; font-weight: bold;background-color:#145E3D;"|Reward Box 6 | ||
!style="text-align: center; font-weight: bold;"|1000[[File:Stpatrick image currency event.png|link=|25px]] | !style="text-align: center; font-weight: bold;"|1000[[File:Stpatrick image currency event.png|link=|25px]] | ||
!style="text-align: center; font-weight: bold;"|2000[[File:Stpatrick image currency event.png|link=|25px]] | !style="text-align: center; font-weight: bold;"|2000[[File:Stpatrick image currency event.png|link=|25px]] | ||
| Línea 216: | Línea 213: | ||
|- | |- | ||
|} | |} | ||
=== | ===Druid Temple=== | ||
The main Grand Prize reward for the St. Patrick's Day event is the brand new Druid Temple upgradable building. This gorgeous 5x4 upgradable building has 10 levels, and once you upgrade yours to its maximum level, the Druid Temple will provide you with defense boost for attacking army, random goods and a generous additional random production, besides population and coins on top of that. | |||
{| | |||
|style="vertical-align:center;"|[[File:Druid Temple 10.png|400px|link=]] | |||
| [[File: | |On level 10, this building provides up to: | ||
| [[File: | *[[File:tinypop.png|20px]]Population | ||
|}<br> | *[[File:tinycoins.png|20px]]Coins | ||
*[[File:tinydef.png|20px]]+28% defense for attacking army | |||
*[[File:tinygoods.png|20px]]+20 random goods | |||
<br> | |||
[[File:more.png|20px]]+1 Random production that may vary between: | |||
*[[File:tinyfp.png|20px]]+25 Forge Points (40%) | |||
*[[File:tinygoods.png|20px]]+25 Goods (40%) | |||
*[[File:Tiny Medals.png|20px]]Medals (15%) | |||
*[[File:Tinysupplies.png|20px]]Supplies (5%) | |||
|} | |||
See all levels and the building stats for the Druid Temple [[Druid_Temple_-_Lv._1|here]] | |||
===St. Patrick's Day Event Avatars=== | |||
Lastly, as always, you'll get to show off your progress to your friends and neighbors, by obtaining one of the two themed portraits. | |||
<br><br> | |||
[[File:PatrickAvatars.png|center|400px|link=]] | |||
Revisión del 08:06 19 feb 2021

ready for the big festivities... would I be right?"

The St. Patrick's Day Event introduced a brand new and unique way to collect some awesome avatars, achievements and buildings as rewards, with a completely new event mechanic. Your task is to help the townsfolk prepare for the momentous occasion, and looking at it, you've got your work cut out for you! Paddy McCharms is the festival's guide, so be sure to listen to him as he shows you around town, introducing you to the townsfolk who will aid you in your quest to throw the best St. Patrick's Day festival ever!
How can I participate in the St. Patrick's day event?
You need to complete quests to earn Pots of Gold. There are 56 quests to complete, 35 rush quests, and then 1 quest for each day of the event. You can also find even more Pots of Gold in incidents around your city. Use the Pots of Gold in the main event window to prepare for the celebrations. You can also purchase additional Pots of Gold for Diamonds if you need some more.
Upon opening the event window, you'll see a map of the town. On the left hand side you have the festival. Towards the center, you'll see one of the town's factories. Click on this to start producing goods for use in the festival. Once the production is complete, they'll put the goods in containers ready for collection. Click on the ferry in the bottom left corner to send it to collect goods from the town, and deliver them to the festival. Once the ferry arrives back at the festival, click on it to collect the goods, and earn yourself some Shamrocks!
Map
Use these newly earned Shamrocks ![]() to upgrade your factories, improving your output, and maximizing production. You can also upgrade your ferry, as well as the festival itself, to increase the amount of goods the ferry can carry across the river, as well as how quickly the festival can use the delivered goods. If you've gathered a lot of Shamrocks
to upgrade your factories, improving your output, and maximizing production. You can also upgrade your ferry, as well as the festival itself, to increase the amount of goods the ferry can carry across the river, as well as how quickly the festival can use the delivered goods. If you've gathered a lot of Shamrocks ![]() , and don't want to upgrade the productions incrementally, tick the 'max' button in the top left corner to upgrade them much faster! Also, if you want to, you can spend Pots of Gold
, and don't want to upgrade the productions incrementally, tick the 'max' button in the top left corner to upgrade them much faster! Also, if you want to, you can spend Pots of Gold ![]() to advance your productions instantly by 2, 4 or 8 hours. This is a quick way to produce additional Shamrocks if you need them.
to advance your productions instantly by 2, 4 or 8 hours. This is a quick way to produce additional Shamrocks if you need them.
To help you get off to a good start you can also read our Getting started guide
But micromanaging these factories isn't all you can do. Paddy has a suggestion to make your life so much easier! He'll introduce you to some fine young folk who, for a fee, will manage your factories. Click on the top hat (![]() ) to hire a manager for Pots of Gold. Hiring a manager not only gives you the opportunity to improve your factories output, but also automates the production of goods, meaning you don't have to click on your factory anymore! You can also hire a Festival Manager, to automatically manage the festival on your behalf, and a Shipyard Manager, to automate the shipment of goods to the festival.
) to hire a manager for Pots of Gold. Hiring a manager not only gives you the opportunity to improve your factories output, but also automates the production of goods, meaning you don't have to click on your factory anymore! You can also hire a Festival Manager, to automatically manage the festival on your behalf, and a Shipyard Manager, to automate the shipment of goods to the festival.
The festival

|
The festival is where you sell all your goods and gets shamrocks |
|---|
The Shipyard

|
The Shipyard is where you maintain and expand your Ferry. This costs shamrocks |
|---|
Goods buildings
There are five different goods buildings. Each produces different amounts of festival goods. The Hat factory is available immediately when the event starts, and the other four can be unlocked by spending shamrocks ![]() .
.
When a building becomes available it will be at level 1. You can use shamrocks to increase the production in your buildings. While every single level will increase the production of your building, reaching certain tiers will unlock production multipliers.
| Levels | Multiplier |
|---|---|
| 1-10 | 1 |
| 11-25 | 2 |
| 26-50 | 4 |
| 51-100 | 8 |
| 101-200 | 16 |
| 201-300 | 32 |
| Building | Description | Cost to unlock. |
|---|---|---|

|
Hat factory. | Free |

|
Flower factory. | 1.1K |

|
Cake factory. | 1.2M |

|
Drinks factory. | 1.5B |

|
Fireworks factory | 111B |
Managers
Click on the top hat to hire a manager for Pots of Gold. Hiring a manager automates the productions of goods, meaning you don't have to click on your factory anymore. And not only that, it will also improve the factory's output even further! Hire a Festival Manager to automatically manage the festival on your behalf, and a Shipyard Manager, to automate the shipment of goods to the festival.
| Levels |  Festival Manager Festival Manager
|
 Shipyard Manager Shipyard Manager
|
 Hat factory Manager Hat factory Manager
|
 Flower factory Manager Flower factory Manager
|
 Cake factory Manager Cake factory Manager
|
 Drink factory Manager Drink factory Manager
|
 Fireworks factory Manager Fireworks factory Manager |
|---|---|---|---|---|---|---|---|
| Level 1 | 20 |
20 |
10 |
20 |
30 |
40 |
50 |
| Level 2 | 40 |
40 |
20 |
40 |
60 |
80 |
100 |
| Level 3 | 80 |
80 |
30 |
60 |
90 |
120 |
150 |
| Level 4 | 150 |
150 |
50 |
100 |
150 |
200 |
250 |
| Level 5 | 300 |
300 |
100 |
200 |
300 |
400 |
500 |
Next Town
Now this is all great, but what's in it for you? As you'll see, along the top of the event window, there are a list of three tasks. Completing a task will prompt you to collect the task, which will contribute progress towards your Grand Prize. Collect 25 tasks to earn the Grand Prize reward! If you're not sure what you need to do for a task, click on the arrow on the right side of the list for a full overview. Once you complete a task, click to collect it, and it will be replaced with a new task, allowing you to work towards more Grand Prize progress.
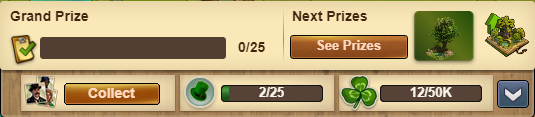
Please note that you don't necessarily need to collect all tasks in order to proceed and unlock a new town. As soon as you gather 8.4 quadrillions of Shamrock, you can click in "continue" to advance and still keep your grand prize progress (in other words, the task progress). Once you've selected your stage prizes, the town progress will be reset and this gives you the chance to start the production over, and earn yourself even more Grand Prizes.

This button will light up as soon as you have 8.4Q Shamrocks
Rewards
Eventually, however, Paddy won't have any more tasks for you to complete. Once you reach this point, click on the 'Next Stage' button in the bottom right to be presented with some end of stage reward boxes. With the Luck of the Irish, snag yourself some fantastic prizes from each box. You can open one container for free, and more containers for Pots of Gold. These costs will increase gradually the more boxes you open using Pots of Gold. Once you've collected all 6, you'll earn the collection reward at the top bar, and if you want, you can open a new set of 6 reward boxes before advancing to the next town.
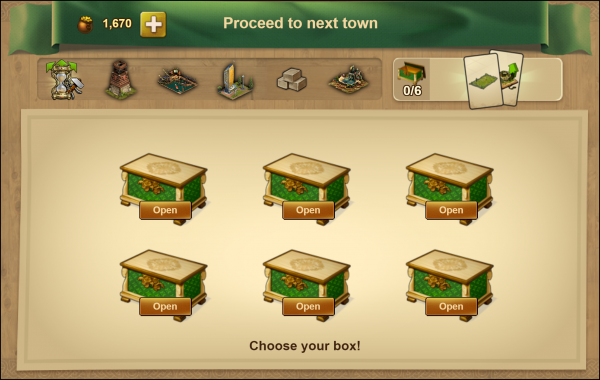
The table below details the cost of opening reward boxes from the end of stage collection screen. The costs continue to scale with each new set of 6 reward boxes.
| Reward Box | First | Second | Third |
|---|---|---|---|
| Reward Box 1 | Free | 50 |
100 |
| Reward Box 2 | 50 |
100 |
250 |
| Reward Box 3 | 100 |
250 |
500 |
| Reward Box 4 | 250 |
500 |
1000 |
| Reward Box 5 | 500 |
1000 |
2000 |
| Reward Box 6 | 1000 |
2000 |
4000 |
Druid Temple
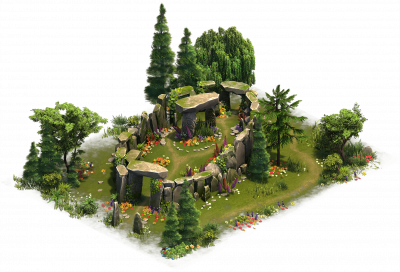
The main Grand Prize reward for the St. Patrick's Day event is the brand new Druid Temple upgradable building. This gorgeous 5x4 upgradable building has 10 levels, and once you upgrade yours to its maximum level, the Druid Temple will provide you with defense boost for attacking army, random goods and a generous additional random production, besides population and coins on top of that.
|
On level 10, this building provides up to:
|
See all levels and the building stats for the Druid Temple here
St. Patrick's Day Event Avatars
Lastly, as always, you'll get to show off your progress to your friends and neighbors, by obtaining one of the two themed portraits.